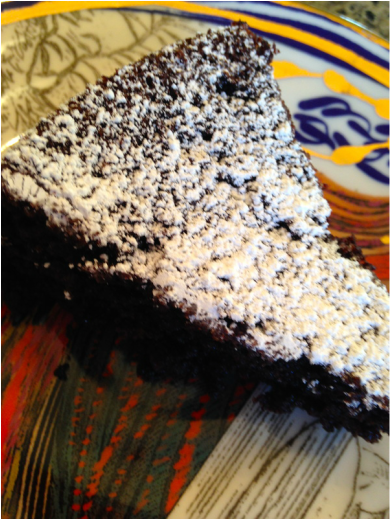
 Yet one more reason I'm wearing elastic pants. If you're looking to drown your sorrows, impress your hubs or accommodate your gluten-free best friend, look no further. This is it. Chocolate Olive Oil Cake A Nigella Lawson recipe Preheat oven to 325. Serves 8 so they say. I don't know 8 people who would want such a small piece, but go for it if you're so inclined. Ingredients: 2/3 Cup Olive Oil plus more for oiling one 9 inch cake or springform pan. 6 Tblsps unsweetened cocoa powder sifted* 1/2 Cup boiling water 2 teas vanilla extract* 1.5 cups almond flour** 1/2 teas baking soda Pinch salt 1 cup sugar 3 Eggs Powdered Sugar for top Grease pan with olive oil or use one of those cans of flour/oil for bakers. Works better I think and you can usually find it right next to the PAM at the grocery. Sift cocoa powder in a small bowl then whisk in the boiling water and vanilla. It will be runny. In another smallish bowl combine the almond flour with the baking soda and salt. Put sugar, olive oil and eggs into a mixing bowl and beat the crap out of it till it's a lovely yellow, thickened creaminess, 3-4 minutes. Turn the mixer down from "beat the crap out it" speed to "lovingly blend" speed and add the chocolate mixture. Then tip in the flour mixture. Mix till its combined, scraping down the sides if you need to. Pour the batter into your prepared pan and bake for 40-45 minutes. Till a toothpick comes out mainly clean but with a bit of sticky chocolate still attached. Let cool on wire rack for ten minutes then run a butter knife around the edges and either spring it out of your springform pan or with a plate held firmly atop, flip it over onto the plate. Alternatively, if you're in a deep depression and just want to eat the damn cake, leave it in the pan. Who cares? Sift a little powder sugar over the top just for kicks. This is a damp cake, it will sink a bit in the center. It's art. It's supposed to look that way. *Get the best quality cocoa and vanilla you can afford. It makes a difference **If you prefer, you can make this cake with 3/4 cup plus 1 Tblsp all-purpose flour instead of the almond flour. I buy almond flour at Trader Joes. You're already making a cake from scratch for Christ's sake. You shouldn't have to grind your own almonds. What's next? Butter churning? 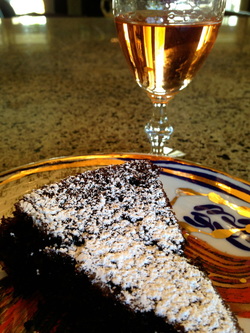 No one is stopping you from accessorizing this beauty with a little Framboise or other red fruited desert wine. We drank cherry. Heavenly. A chocolate covered cherry in the best most sophisticated sense.
2 Comments
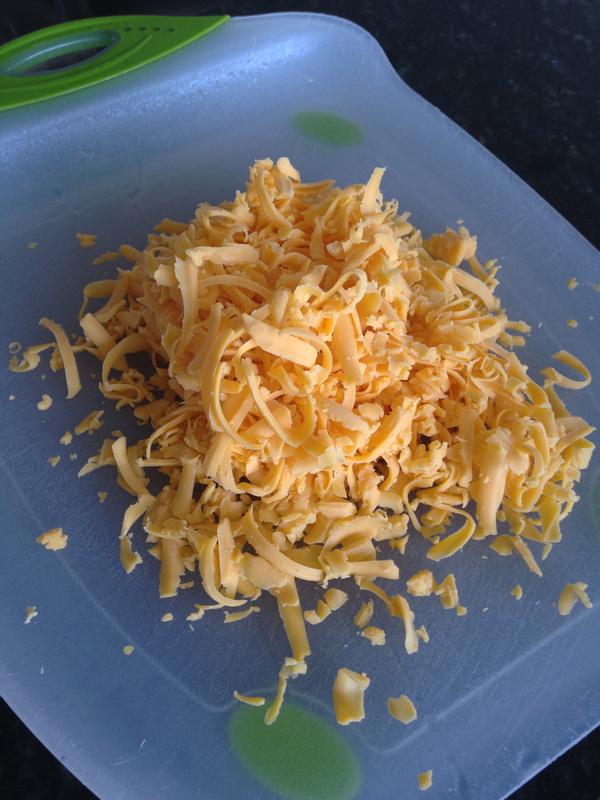
 Here's the thing - I love to eat. I love to buy expensive cookware. I've discovered I really like to cook. But, I loathe the grocery store. And, I'd rather gouge my own eyes out with a pair of All-Clad locking stainless steel tongs than go to any farmer's market. I mean, seriously. Is it organic just because it still has dirt on it? Is it a rule that women selling home-grown food from a stall can't have shaved their armpits since the Carter administration? So, you get I hate shopping for groceries of any kind, anywhere. But, there I was - navigating through the grocery store with my usual churlishness. Prisoners trudge to the electric chair with more vigor. Anyhoo, while trying to decide between no fat yogurt and a donut, I saw it. 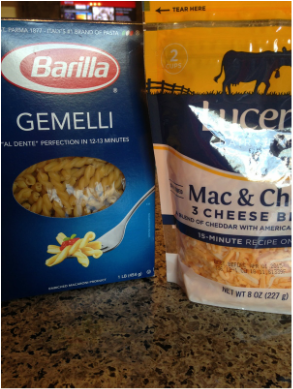 I think I've mentioned before that I suck at food blogging because I can't get the photo part down. I digress...what I saw was not the pasta, but the bag of Mac & Cheese blend on the right. My life changed right then and there. God spoke to me. As any self respecting cook can tell you, good homemade macaroni and cheese is as elusive as a cheerful nun. I've tried them all. I've used every combination of expensive cheese you can think of. Blue, Gruyere, Swiss, Cheddar and don't forget Goat. I've added caramelized onions, roasted mushrooms, pancetta, lobster. No matter. Not one combo was worth the effort. I might as well disclose that I am a HUGE fan of the boxed Mac & Cheese in the box with the little packet of pulverized cheese product and salt. Let's face it, any food item that requires 1/3 cup of milk and half a stick of butter is good eatin' in my book. I'm gonna assume you feel the same, whether or not you want to admit it. So, while suffering at the altar of Von's, God told me the secret to the world's best Mac & Cheese - American Cheese. God also said He didn't think American was really a cheese, but WTF? God totally says WTF. I know it was God because he told me to go ahead and get the donut - not the non-fat yogurt - and a pack of already grated American cheese made especially for Mac & Cheese. Since this was the first time God had ever spoken to me directly, I perked right up. I scurried home faster than Spartacus on the last lap of the chariot race to make the best Mac & Cheese known to man and the angels. Ahhh...but how? Well, I had no idea. Then, God spoke to me again...and you guessed it..."1/3 cup of milk and 1/2 stick of butter," He said. I boiled half a box of pasta, drained it, then realized like I usually do, God doesn't know everything. I plopped the cooked pasta (feel free to use any shape) back into the pot, tossed a couple big handfuls of the cheese mix and a couple splashes of cream. Stirred it around, threw on some salt and pepper and called it good. Let the church say, "Amen." Best ever. Right up there with the boxed kind. I know, I know, why make anything but the boxed kind if it's near perfection as is? I'm glad you asked. Because you get to lord it over everyone that you make Mac & Cheese from scratch. What other reason do you need? 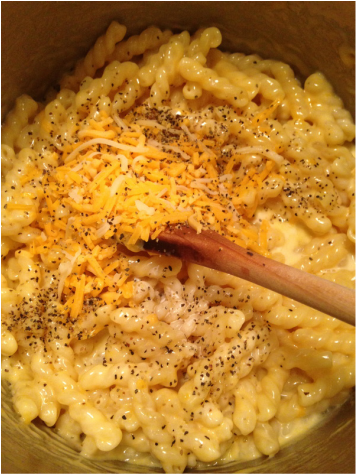 It's a big bowl of beautiful, isn't it? And, if you're prone to frippery, feel free to add anything you want. Bacon comes to mind. But, it always does, doesn't it?
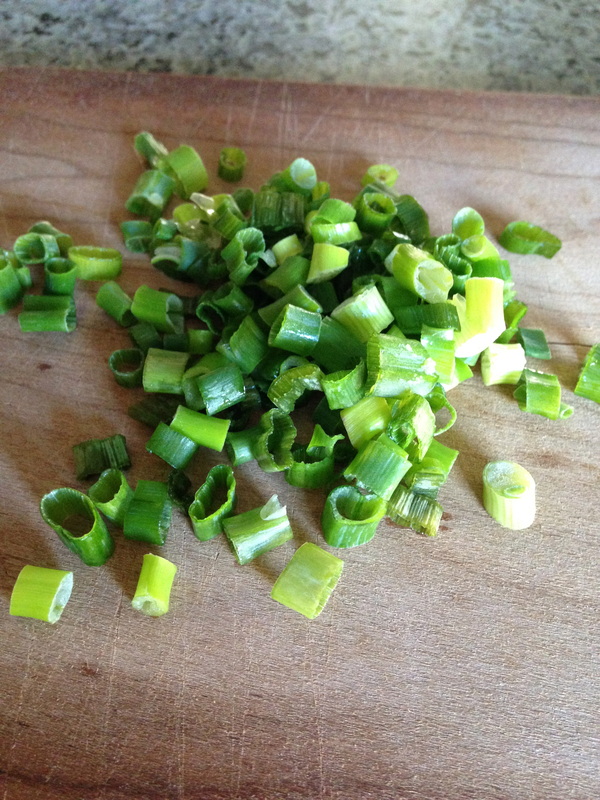
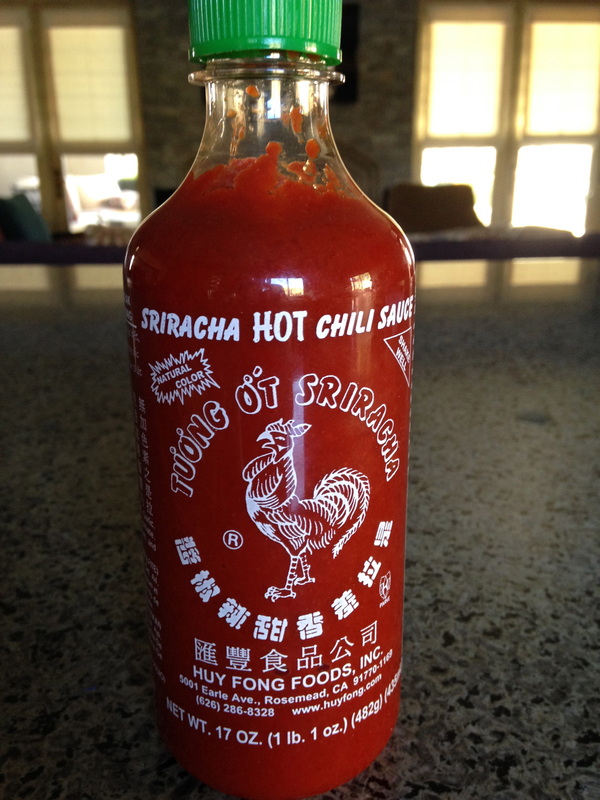
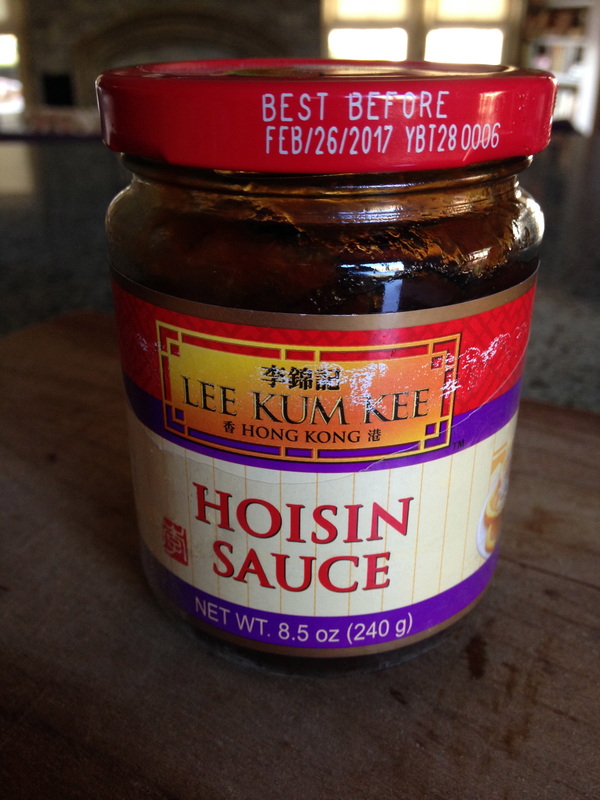
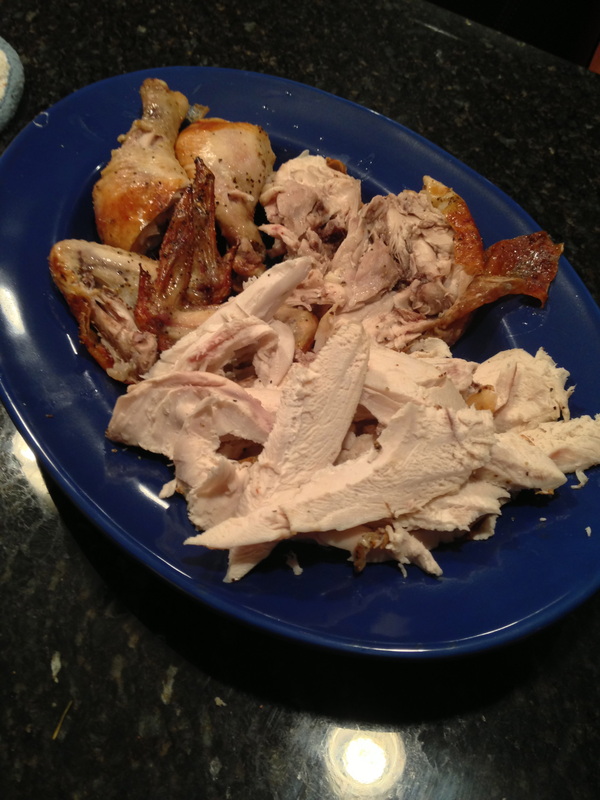
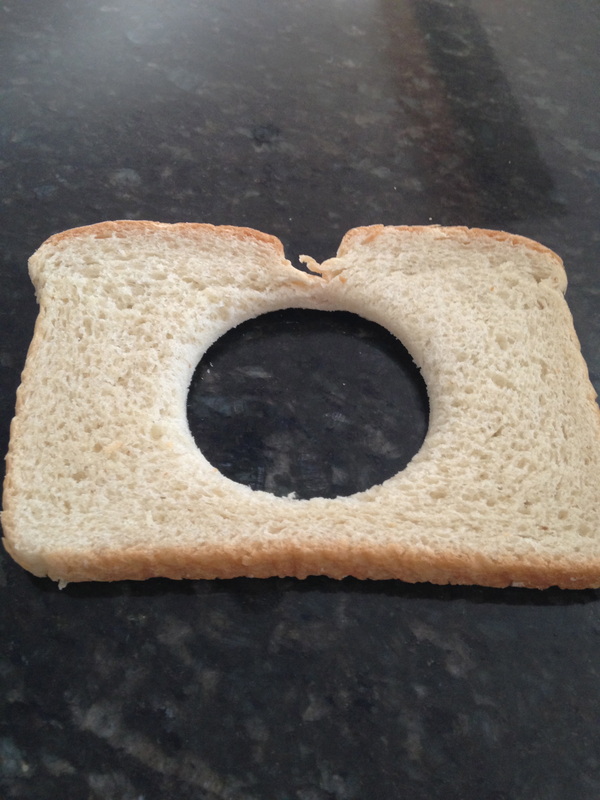
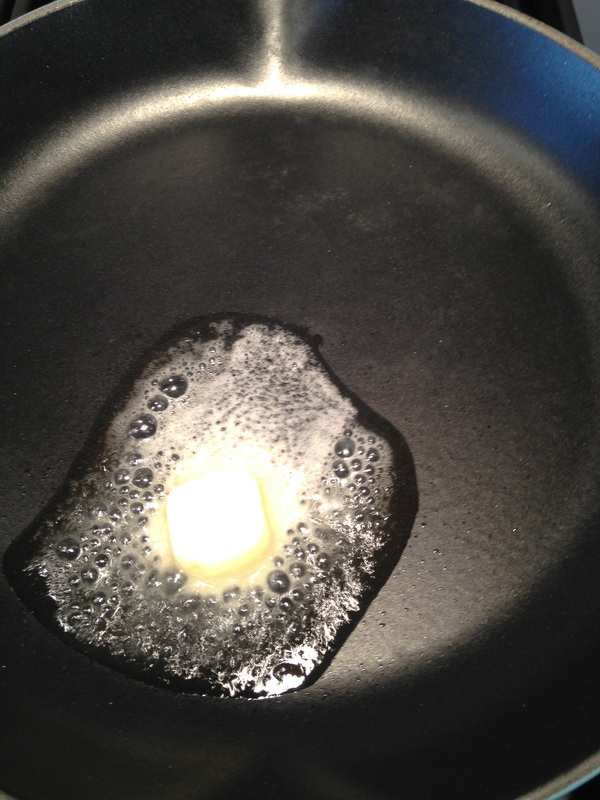
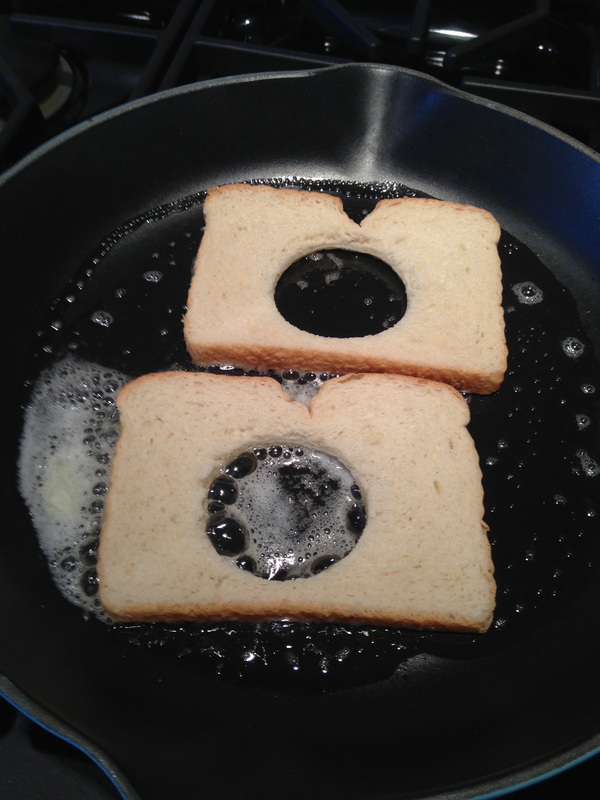
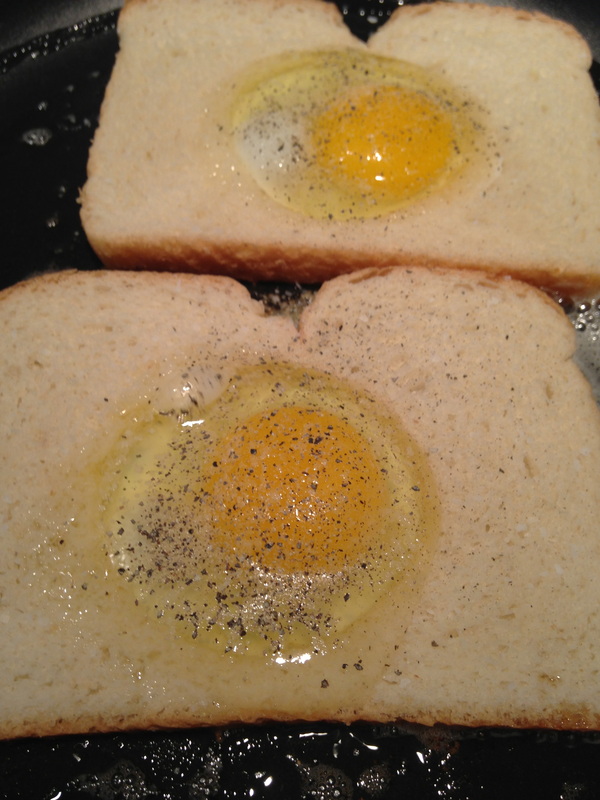
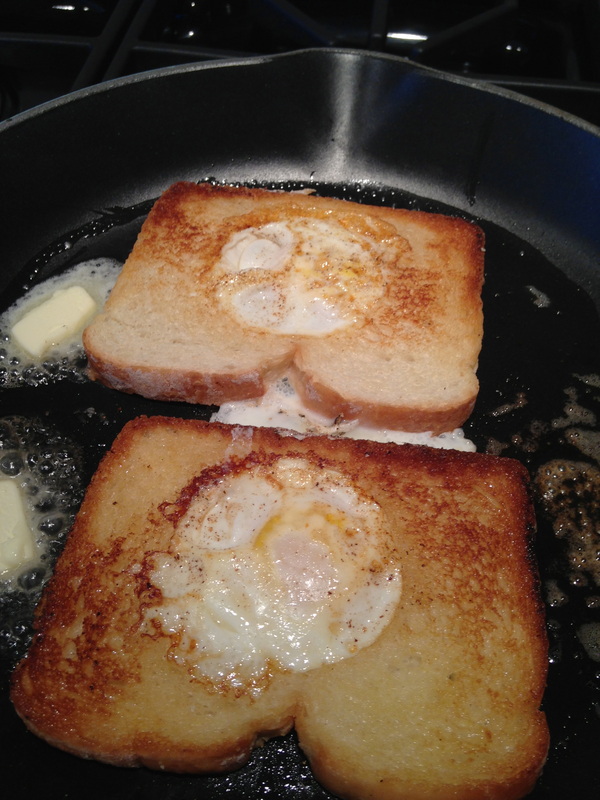
I apologize that there really isn't a recipe, but you know how God is. He likes to stay ambiguous so everyone can interpret what He says however they want. Feel free to contact me if you're confused and I'll tell you what He really means. That's what I do for Hubby all the time. 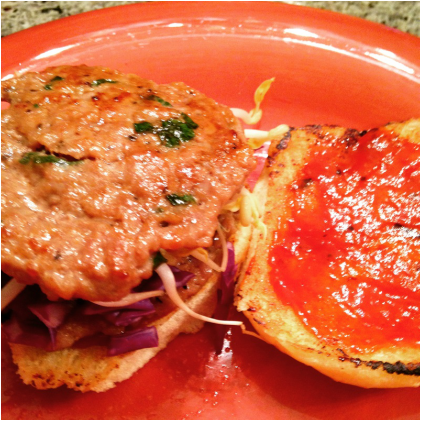 If there's one food I could never live without, it's a burger. Since I'm half Chinese (and half Italian, half French, half Mexican) I couldn't pass up this chinese style burger. With apologies in advance to Edward Lee whose cookbook Smoke & Pickles changed my life. I jacked and hacked this recipe from him. The Cast of Characters: One of the many (many) reasons I'm not a food blogger, per se, is because I suck at remembering to take photos. So, while these pics are nice and all it's not a complete gallery. Close, though. The original recipe calls for making your own ketchup. I don't do ketchup. I eat it, I don't make it. The idea, it seemed to me, was that the ketchup needed to be spicy. So, I made it spicy. It also called for Kimchi as a condiment. Now, I'm not gonna say I don't do Kimchi. I can say I never have before. I didn't have time to rot my own cabbage and I don't trust a store called Vons or Albertsons to carry any Kimchi that's edible. So, I do what I always do in these situations. I improvised. Well, that's sort of a lie. I often just skip it. 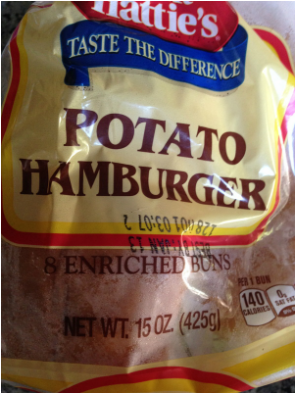 There're these too. No, it's not a potato hamburger. No potatoes were used or harmed in the making of these burgers. Just the buns. I guess the buns are made with potatoes. Who cares? They were on sale. Anyhoo, I guess the only important ingredient missing is the pork. And the salt and pepper. But who needs pics of salt and pepper? Here's what I did: Serves 4 Pork Mix: 1 lb. ground pork (please don't use uber lean pork. You want some fat. Really.) 2 tblsp. Hoisin sauce 3 green onions, sliced. Green parts only. Salt and Pepper to taste (the recipe called for 1 tsp salt and 1/2 tsp pepper. I thought 3/4 of a tsp of salt would've been plenty). Condiments: Ketchup Sriracha (Asian Chile Sauce) Cabbage - sliced thin Bean sprouts - a couple handfuls or less 4 Hamburger buns Butter for the buns if you want to brown them In a medium sized bowl, throw in all the pork mix ingredients and mush them all together like you would a meatloaf. Try to get 8 patties out of it. You want them thin. I only managed 7. You'll be using 2 patties per burger. Make your patties and put them on wax paper. I made a little tower of two patties topped with waxed paper then another two patties and another piece of wax paper (you get it) in a round cake pan. Refrigerate the patties for at least 30 minutes. While those are firming up in the fridge mix some ketchup with some Sriracha. I don't know how much ketchup you want to use on your burgers or your heat tolerance. I used about 4 tblsp of ketchup to 1 tblsp of Sriracha. We had fries too, and I used the spicy ketchup for those as well. No law that you have to have fries but no law against it either. Slice up the cabbage thin. You're gonna use both the cabbage and the bean sprouts on your burger instead of lettuce and/or tomato etc. Fry the pork patties till they're done to your liking which won't take more than a few minutes on both sides. I use a griddle so I browned my buns on it too. It's really none of my business what you do with your buns. Smear some spicy ketchup on both bun halves and place one pork patty on it. Sprinkle on some cabbage and bean sprouts and crown it with another pork patty. Put the top of the bun on and eat it! In case you forgot what they look like.  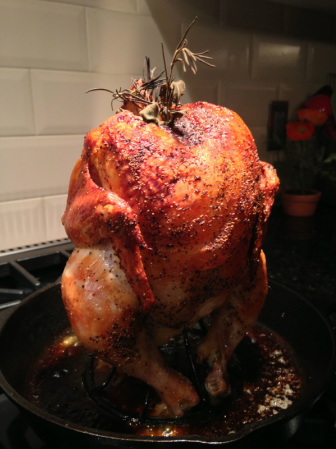 ...chicken's ass. I find it greatly improved after a meaningful probe, like so many others I could name. I didn't make this method up. I wish I had though. It's a chicken squatting on a thingy that you put in a roaster or whatever pan, and then cook it. I think some people use beer cans. Empty? No idea. Rather than google it and use a cheap can I searched high and low for this high end (or would that be low end?) gadget. It's what I do. Such was my zeal to cram this up the backside of my bird that I forgot to take a photo. But here it is:  Grab his oily, orangey, salted and peppered little self and stuff him on the Eiffel Tower. That obscene, phallic thing sticking out the top is the neck...so they say. I didn't like the looks of it so I did some quick accessorizing. 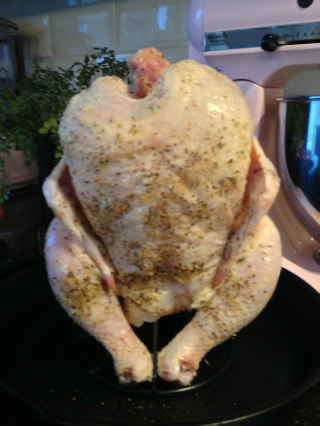 I'm sure there are other brands, but this is a Spanek. Note it's resemblance to the Eiffel tower. If you have to have something stuffed up your arse...might as well look like a French landmark. 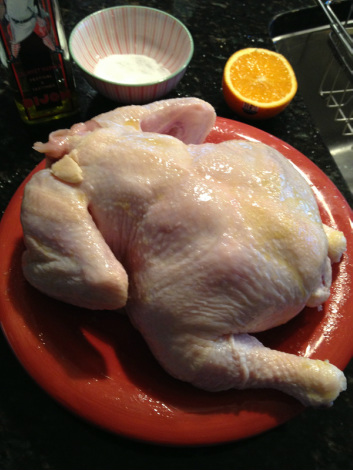 Preheat your oven to 450. First, you need to make sure the wily thing doesn't take off. Once they get a gander (that's almost a pun) at that Spanek, they're not that into it. You can see this guy was trying to make a run for it... Remove all the gross innards that come inside your chicken. Does anyone under the age of 80 use any of that crap? I refuse to cook anything that looks like a blister. Anyway, make sure the bird is empty. Rinse it out and off, then pat it dry with paper towels. I squeeze the juice of an orange over it and in it, then smear olive oil all over it (all sides) then shake a good dose of salt and garlic pepper everywhere. You can spray or oil the Spanek too, if the spirit moves you. It didn't me.  I put some herbs I had on hand to good use. The Spanek takes up most of the room inside the poor chicken so you've got to get creative with the bling. One must suffer for beauty though, and I think he looks quite a bit better with a bit of festive greenery around his collar. I'm sure you agree. 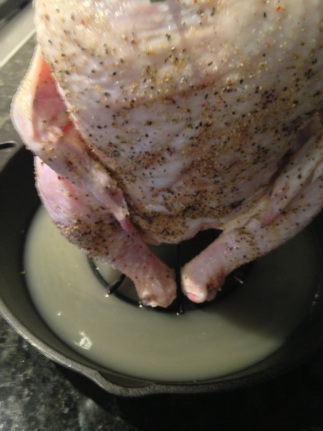 Put the whole undignified mess into a pan that has at least 2 inch edges and has enough room to pour about an inch of liquid. I used an 8 inch. cast iron skillet and some chicken broth. They say (no idea who they is but they're full of advice) to keep adding liquid so your oven doesn't smoke up. I didn't, and the oven didn't. It was just right. Not much liquid left and all the rich, crusty bits intact on the skillet's surface. 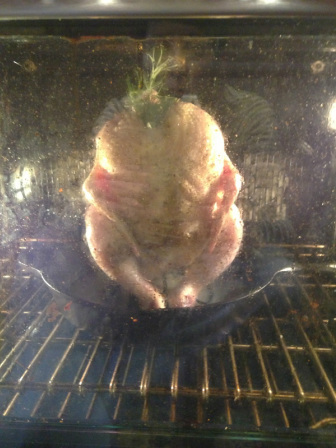 And here he is. Handsome devil, no? Roast at 450 for 15 minutes then turn the oven down to 350 and continue to roast for a total of 15 minutes per pound, including the initial time at 450. So, if you have a 4 pound chicken it will cook for a total of one hour. But, use your judgement. I think I cooked mine about 20 minutes a pound. If it doesn't look done, it isn't. 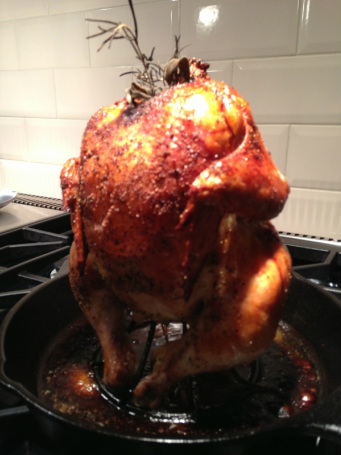 Here's how I like mine. Crispy. See those glorious drippings gathered in the skillet? That's what I'm talkin' about. Don't get rid of those! You gotta make gravy. Pull out the withered greens and the Spanek. You can lay it on a cutting board first, and then pull it out. Using your hands (but the chicken's hot) or forks. The method I use, that never fails, is I have my hubby do it. But have at it, if you're inclined. He took one for the team, for the benefit of all. 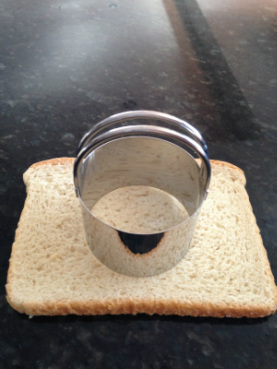 I haven't posted food in quite a while. My second novel (STILL in the works) is about a chef so food is on my mind when I'm writing it. So, it stands to reason that this recipe has nothing to do with the book. I just think it's a creepy looking thing that kids love and there are only 3 ingredients. I figured, meh, what the hell? I'll post it. You need: Eggs Bread (big enough to still have bread around the edges after you cut a hole in it) Butter Salt and Pepper (I don't count these as ingredients. I just don't.) Melt a couple TBLSP of butter in a skillet, Cut holes in however many pieces of bread you're going to eat. I use a 2 inch biscuit cutter. Or, is it 3 inch? Like I'm an engineer? Just get a hole about this big in your bread. Plop them into the sizzling butter. Let them toast a few seconds. After a bit, break one egg into each hole. Salt and pepper to taste and let them toast longer. I just keep peeking underneath till I think it's toasty enough. Then, (here's my favorite part) put a couple more TBLSPS of butter in the skillet and turn the bread over, making sure the butter gets underneath it. Now you just sit there and wait. 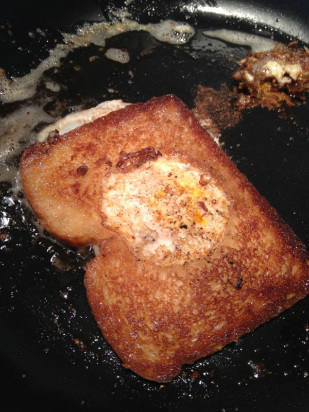 I like mine to look like this. You can let them cook as long or as little as you want, depending on how you like the yolk. Way runny (gag) semi runny (yum) or stiff as a board (better than way runny). 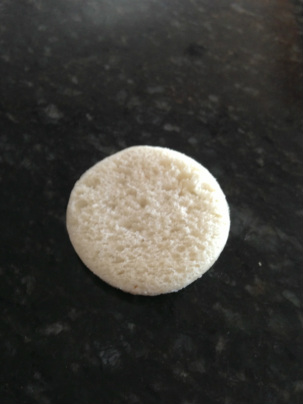 These little jewels are the bread holes. I wouldn't discourage you from throwing them in the skillet and smooshing them around in the melted butter until they're adorable little rounds of toasted goodness. 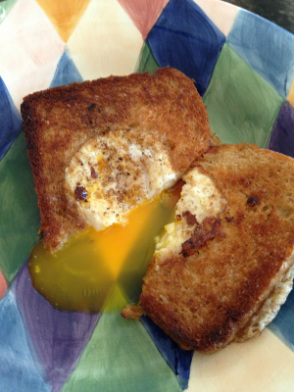 This was hubby's. He likes a runnier yolk. But you get the drift. How easy is this?
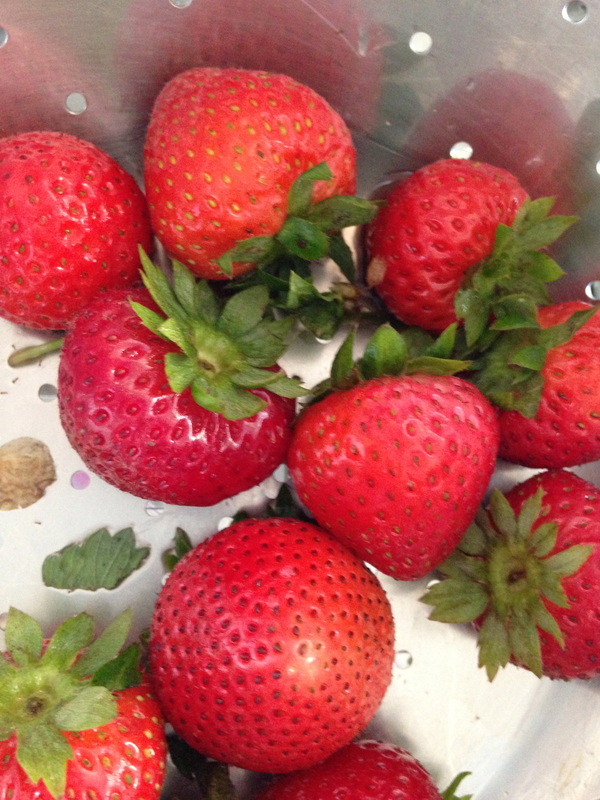
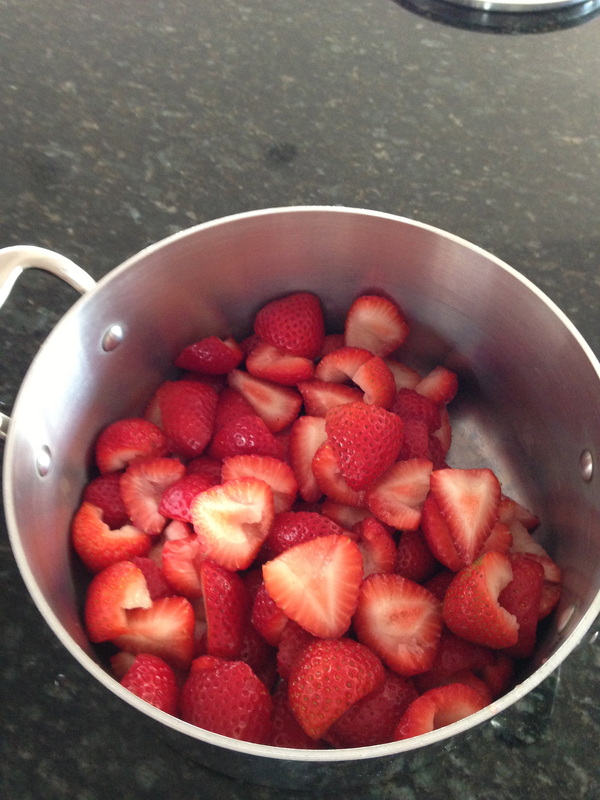
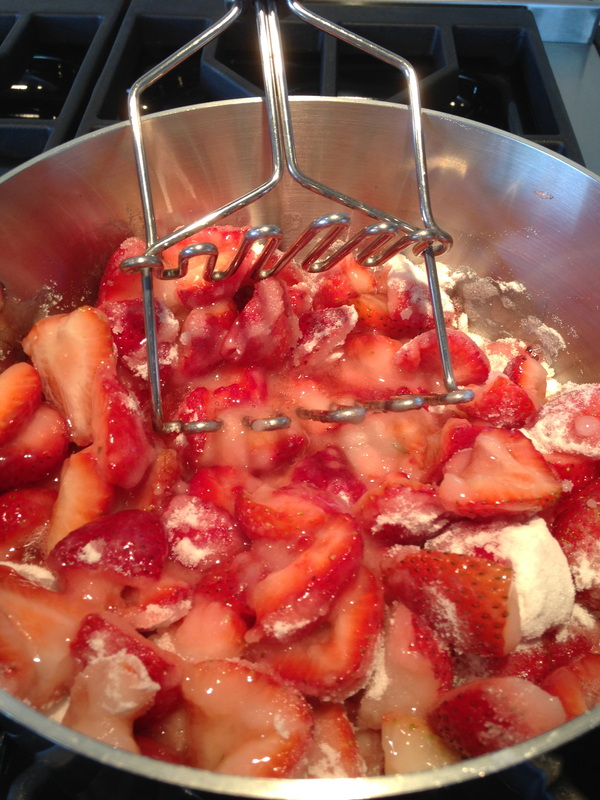
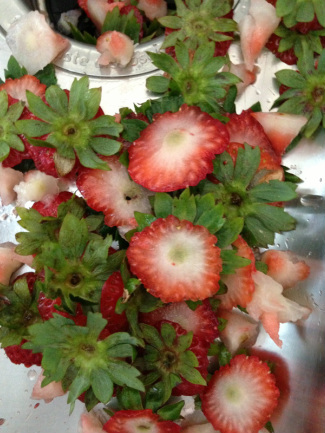 I've discovered the easiest way to make jam. Or, close enough. You can do this with pretty much any fruit. I chose strawberries because they were in season. I think they're out now but for some reason they're still all over the place. All you need is: Fruit Sugar That's it. It's equal parts fruit and sugar. I used about 3 cups of strawberries to 3 cups of sugar. It seems like a lot of sugar. And, to be honest, I don't always use that much. Depends on my mood. I think here I used 2.5 cups. But, feel free. You just hull and slice the berries, put them in a sauce pan and pour the sugar over them. Over medium high heat smash up the berries a bit with a potato masher and bring to a boil then turn down to a simmer. 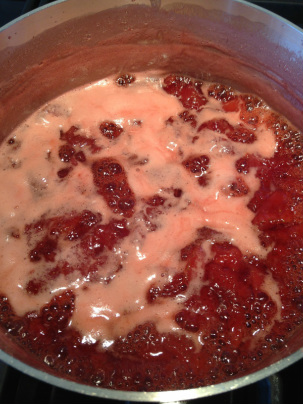 Simmer over medium low heat for about 30 minutes. Or, until it gets thick like this. Take it off the heat and let it cool. It gets thicker as it cools.  Once it's cool, put it in jelly jars. I don't boil jars. I don't use pectin. No one has died as a result. I think if you wash the jars in your dishwasher or really hot water, you're good. You can't keep this in a cupboard though. It has to be refrigerated or frozen. I freeze it all the time. I don't know how long it will last because we eat it a lot. But, I think I've kept some in the freezer for 4 or 5 months and it was fine. This is really good with blackberries too. This is it on a scone. Yummo! 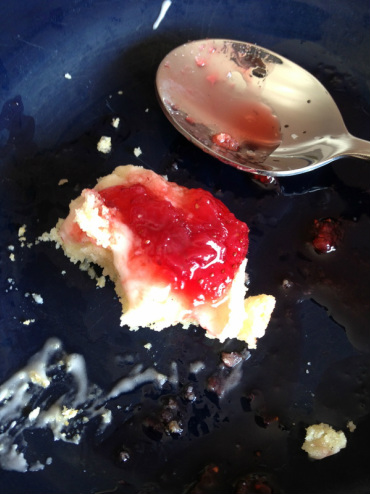 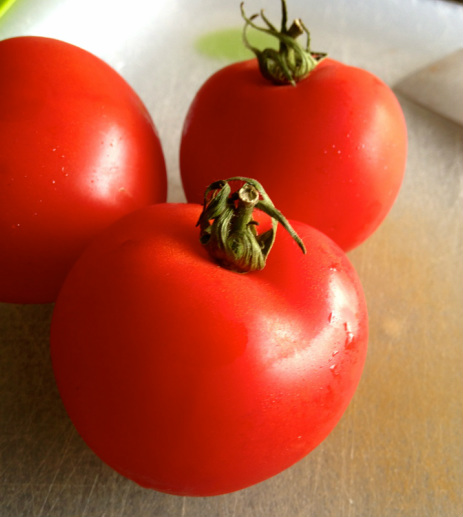
I haven't posted any food lately. Well, other than Italian food...made by Italians. I meant food made by me. So, I thought I'd share a super easy way to make your own sun dried tomatoes...without the sun. Tomato season is winding down, but these days you can get at least decent tomatoes all year round. But, this recipe is best (of course) when tomatoes are at their finest. 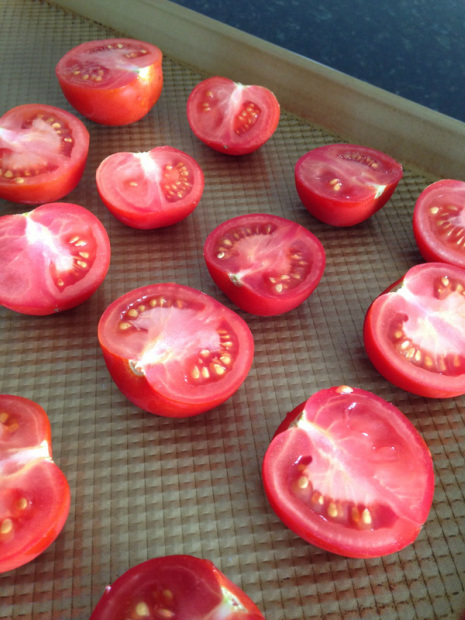
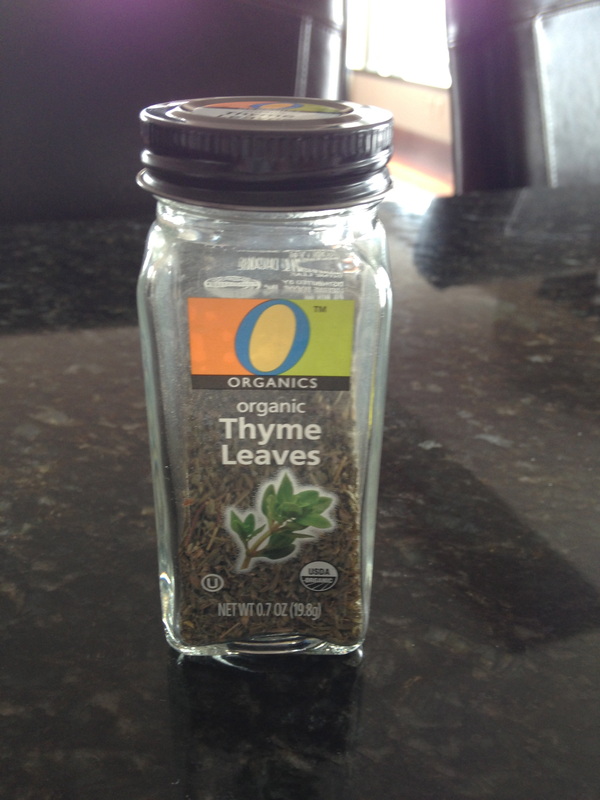
Here's what you need: Tomatoes Olive Oil Salt Sugar Dried Thyme That's it. Preheat your oven to 500. Yes, 500. These tomatoes are smallish. In between a cherry tomato and a regular sized one. This recipe works great on cherry tomatoes but I wanted to try out a little bigger one, just for kicks. Pull any stems off the tomatoes and slice them in half. Lay out, cut sides up on a baking sheet. Drizzle with a good amount of olive oil. Sprinkle with a few pinches of salt, a few pinches of sugar and a few pinches of dried thyme. 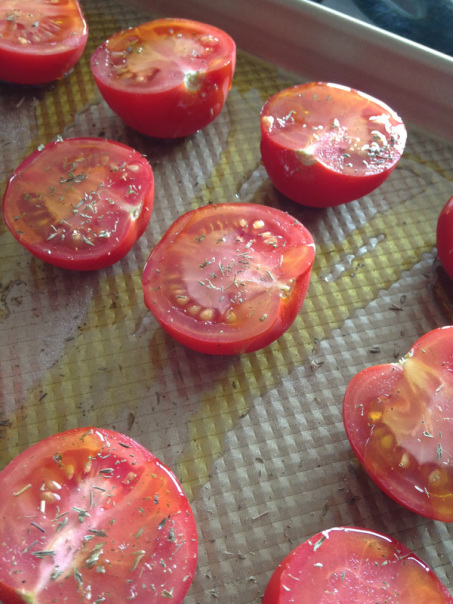
They'll look like this. Then you smoosh them all around to make sure the oil coats them all over. 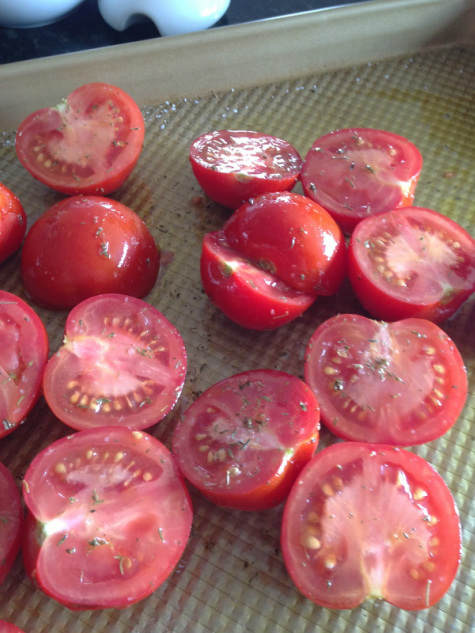
Then they'll look like this. But you need to turn them so they're all cut side up again. This is the most work you will do on this recipe. Then you put them in your 500 degree oven. As soon as you shut the oven door (THIS IS IMPORTANT) turn the oven completely OFF. 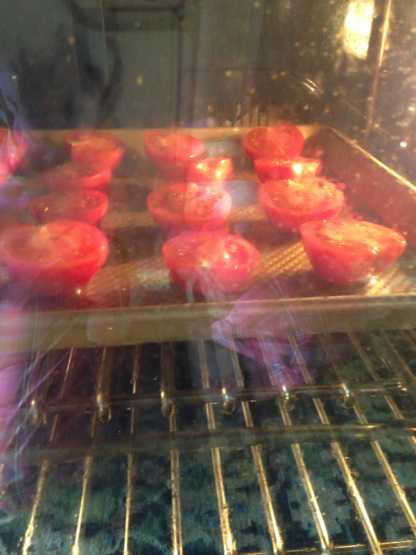
Now that they're in there...DON'T OPEN THE OVEN DOOR for at least eight hours. I usually think to make these at about noon. I have left them in the turned off oven for a day and a half because I forgot about them. They were no worse for the wear. 
Normally, when I use cherry tomatoes they look more like a traditional sun dried tomato. These were a bit bigger. Delicious, nonetheless. Pop them into a container and keep in the fridge. DON'T forget to scrape in any of the oil in the pan too.
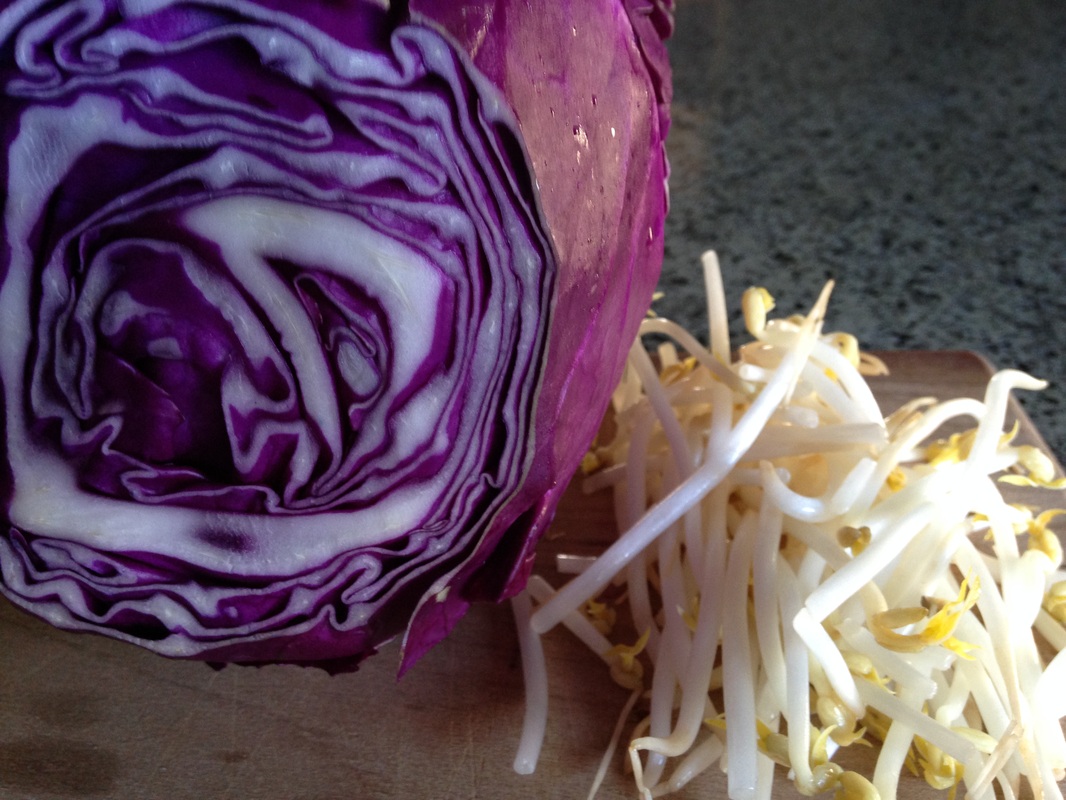
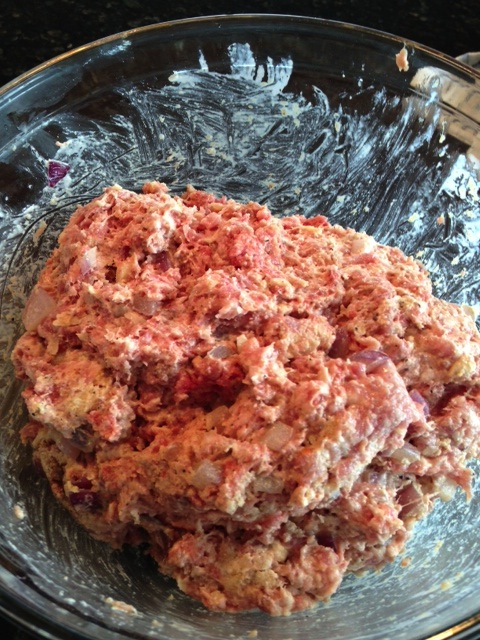
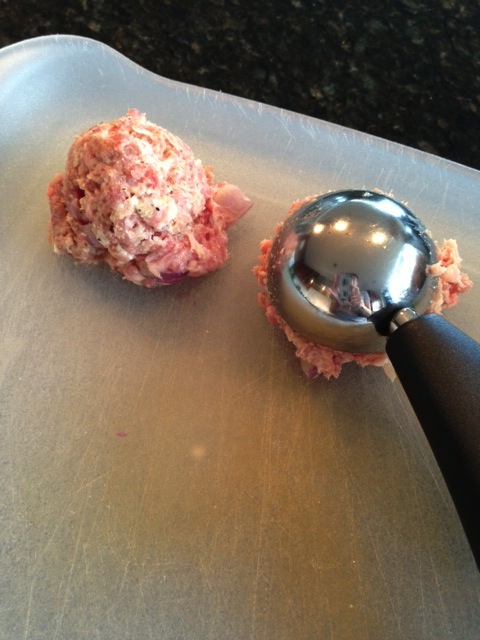
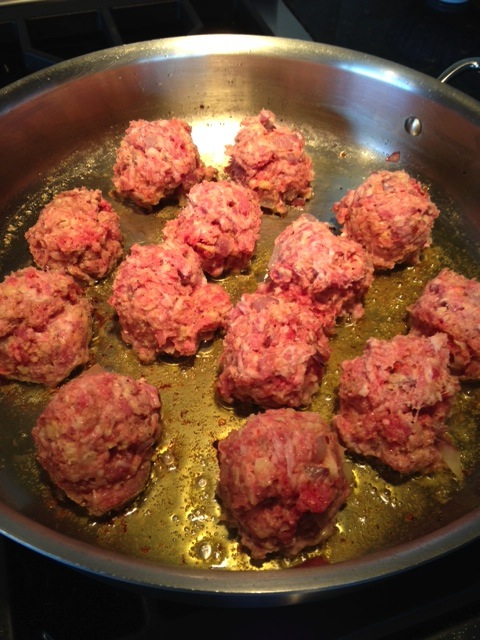
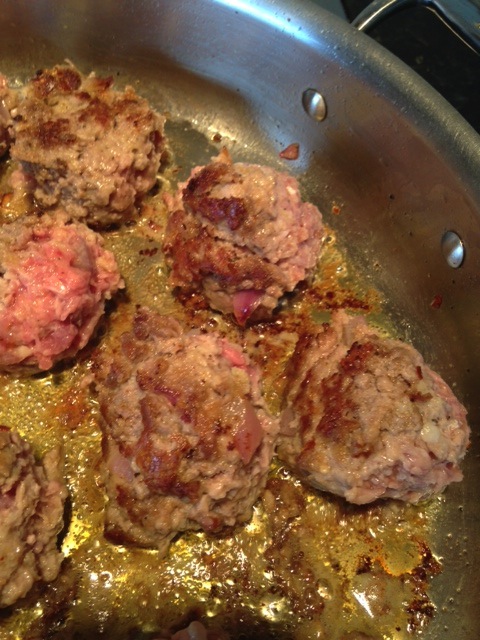
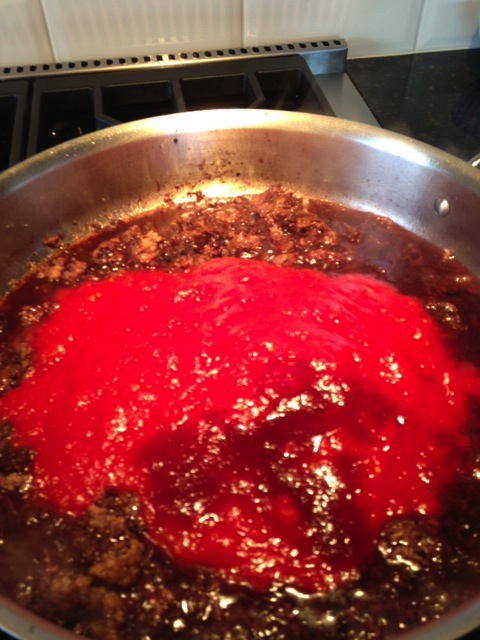
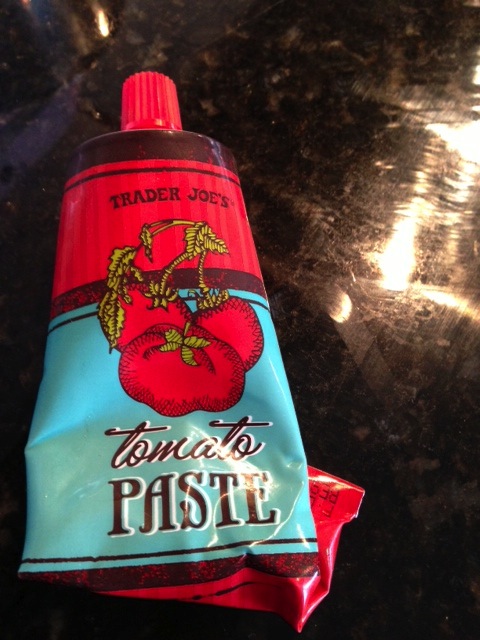
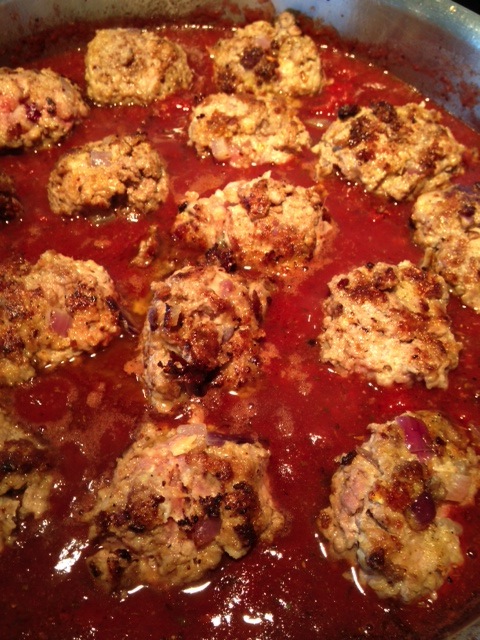
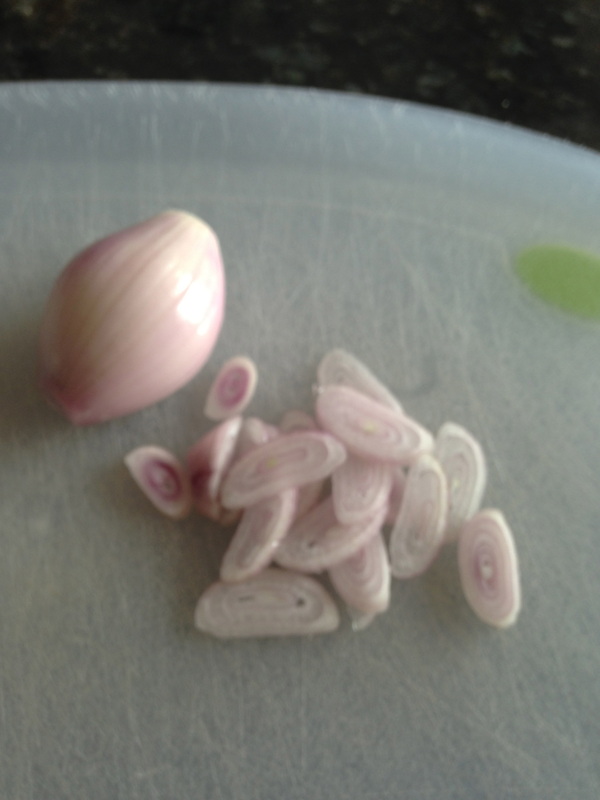
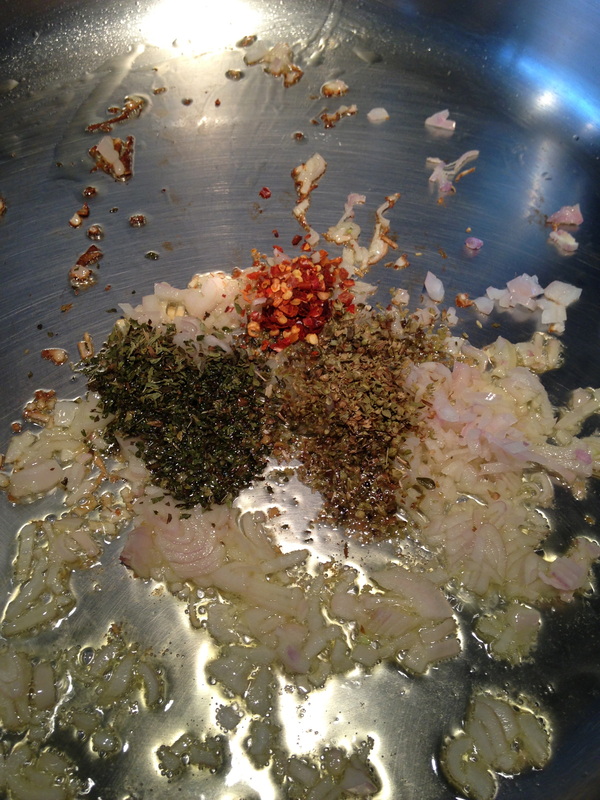
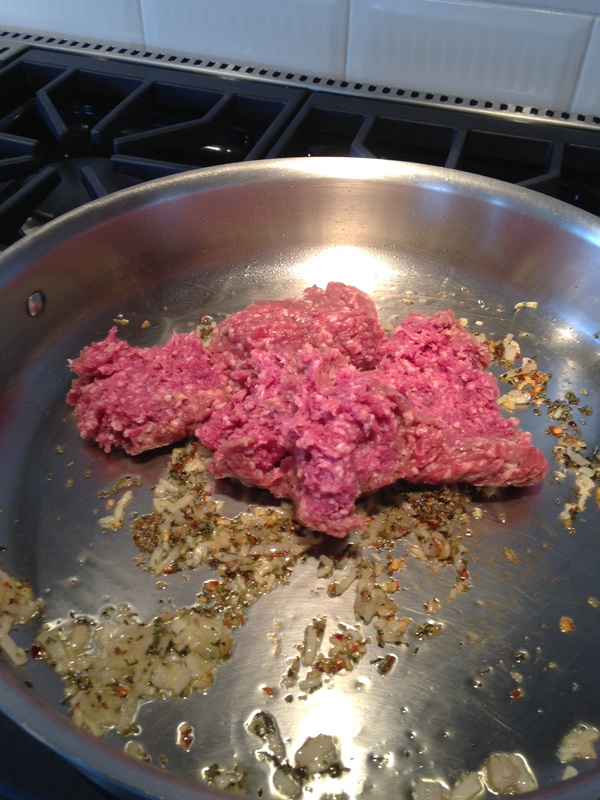
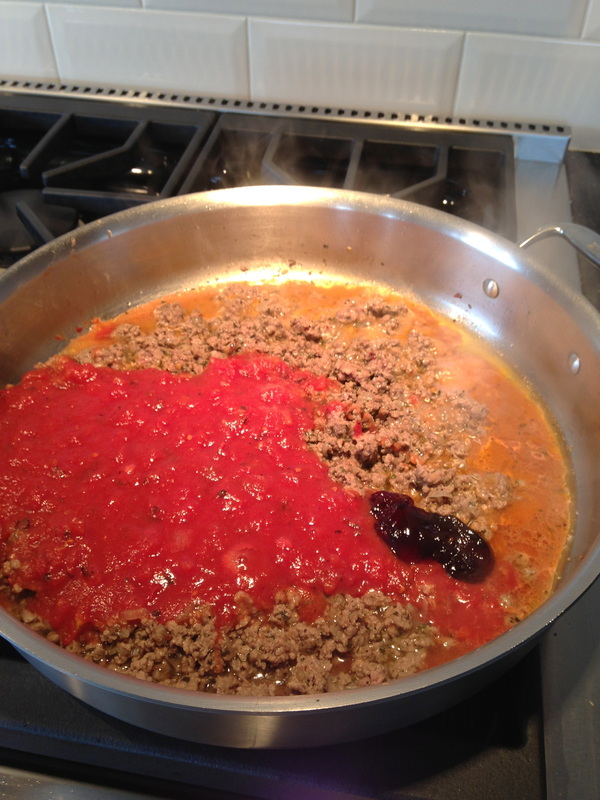
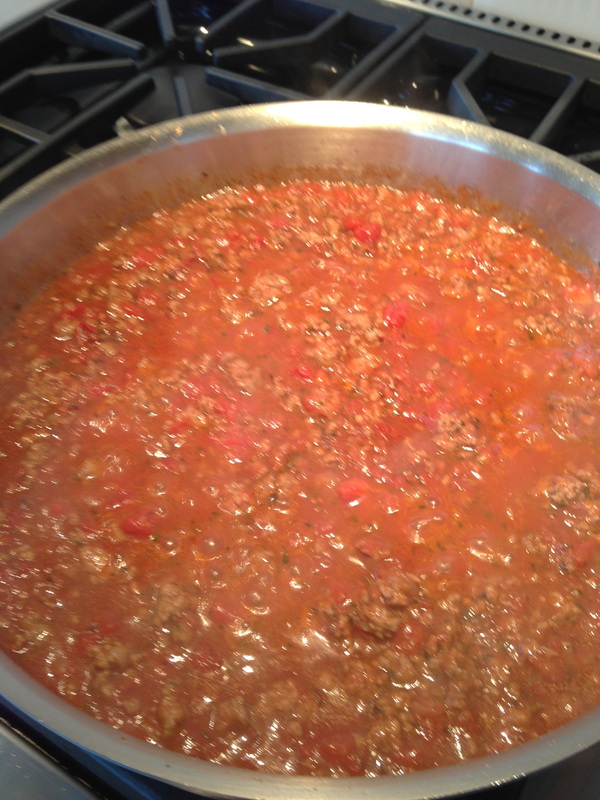
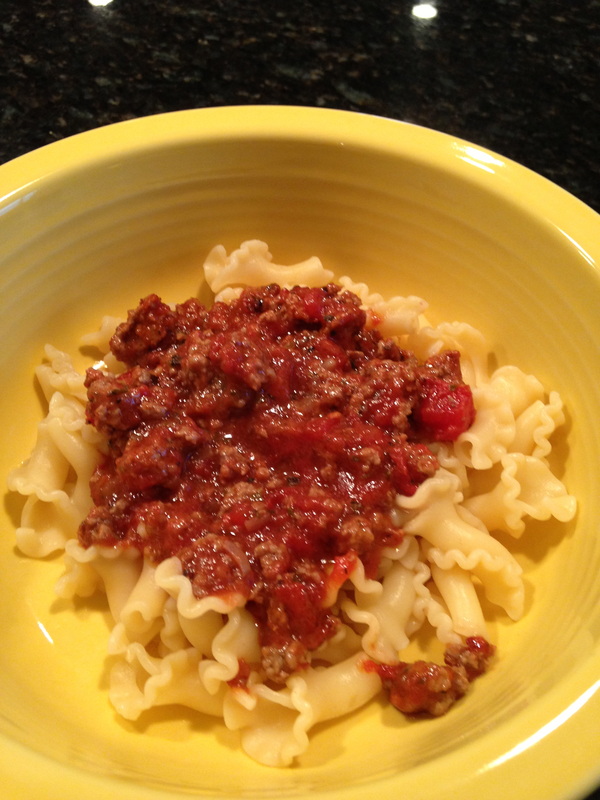
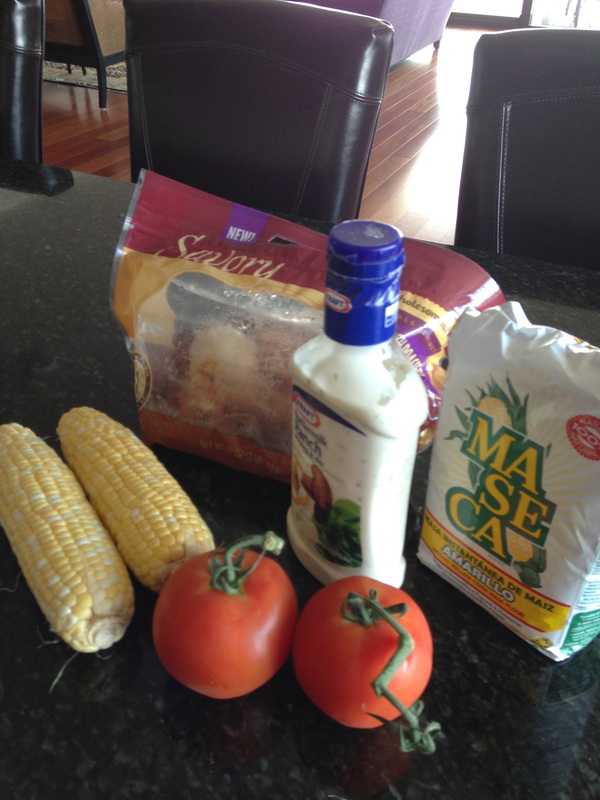
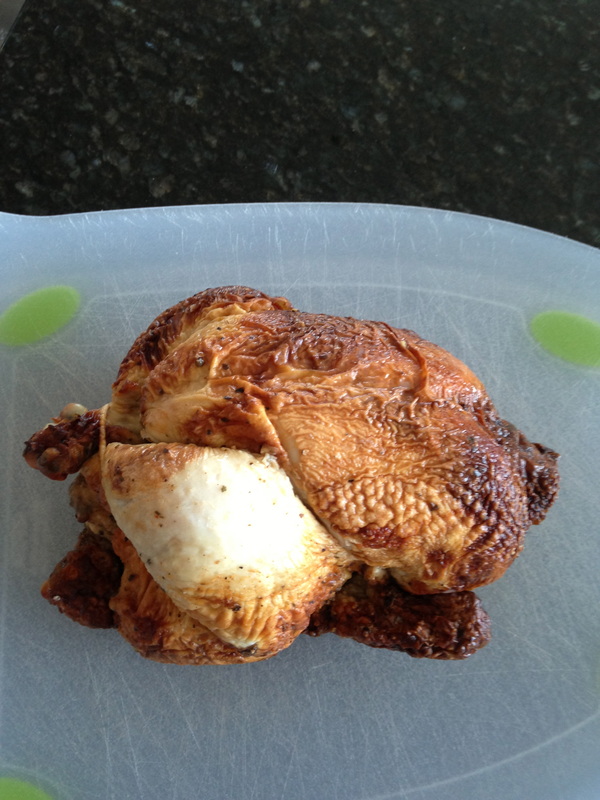
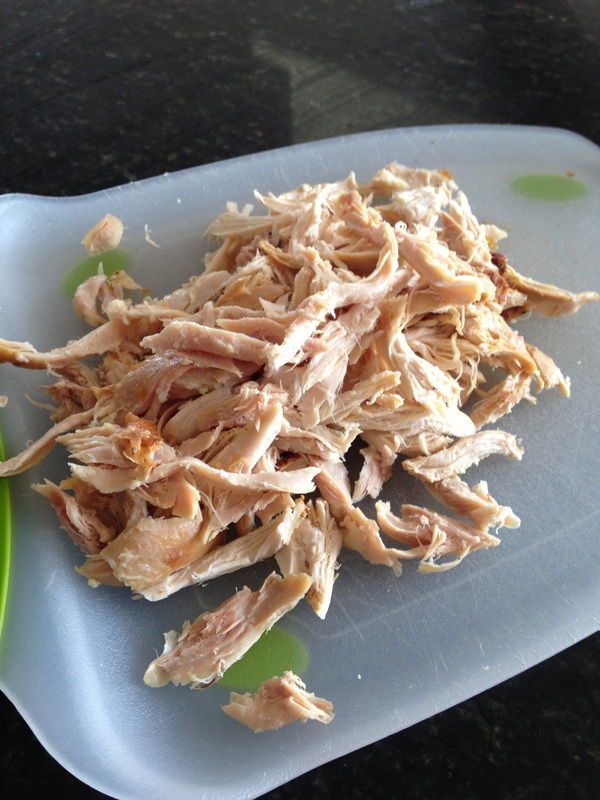
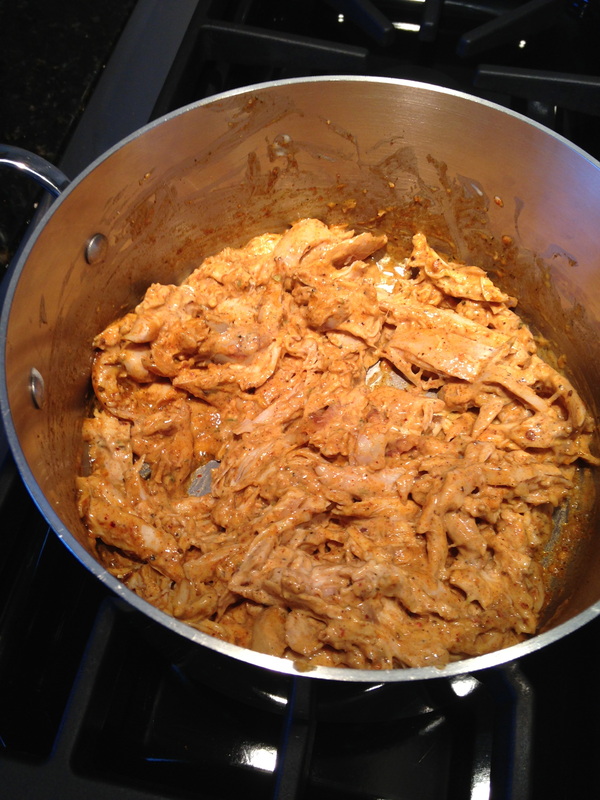
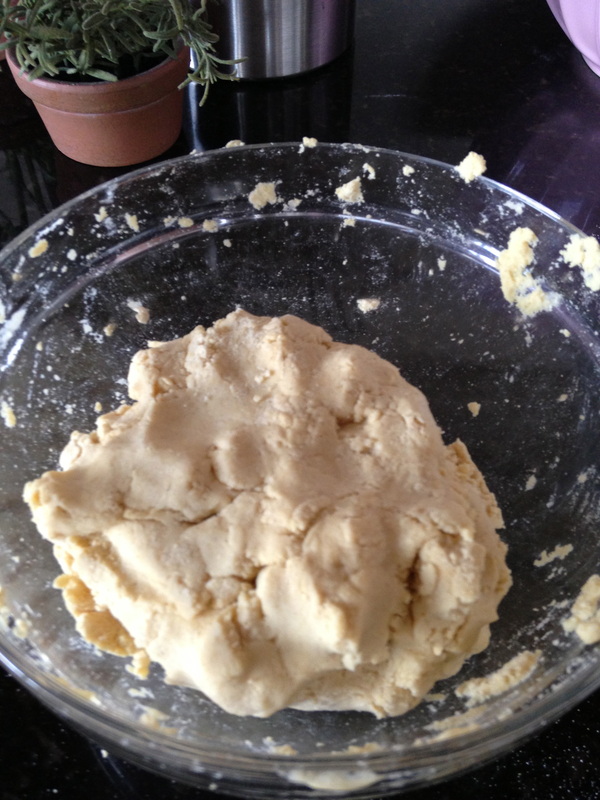
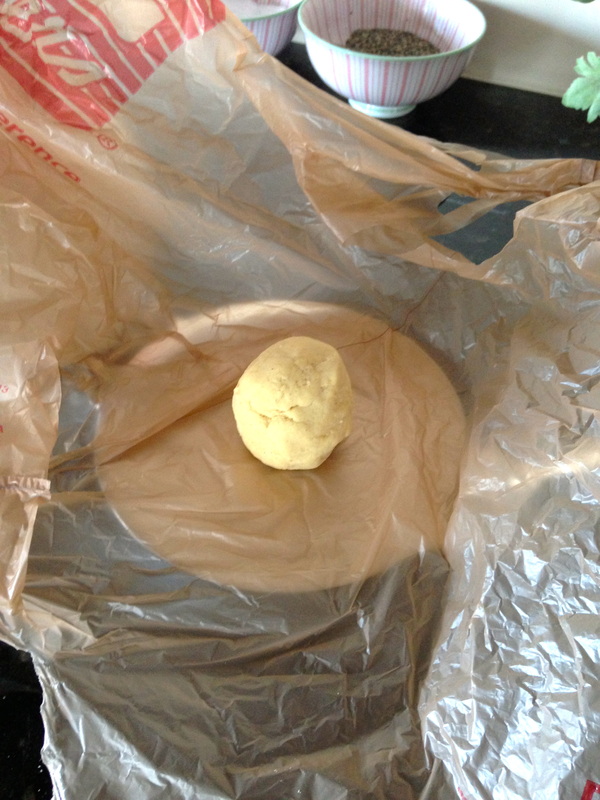
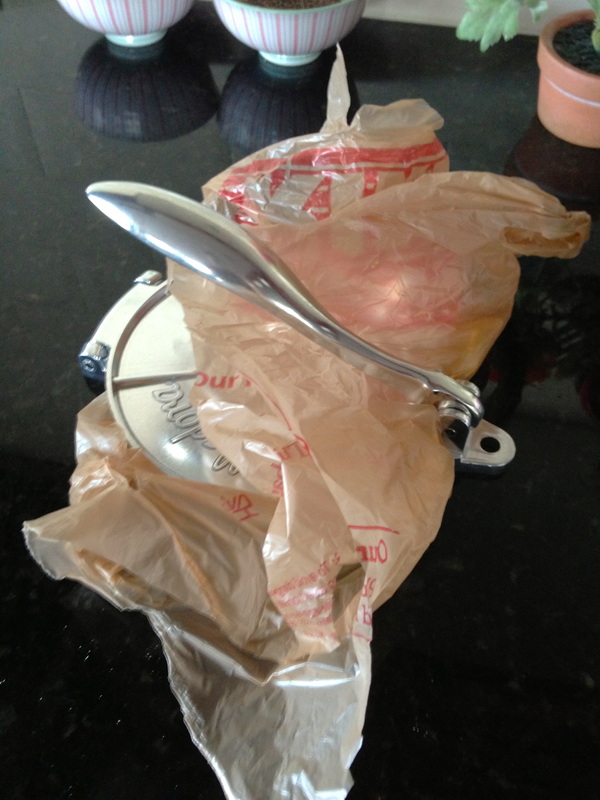
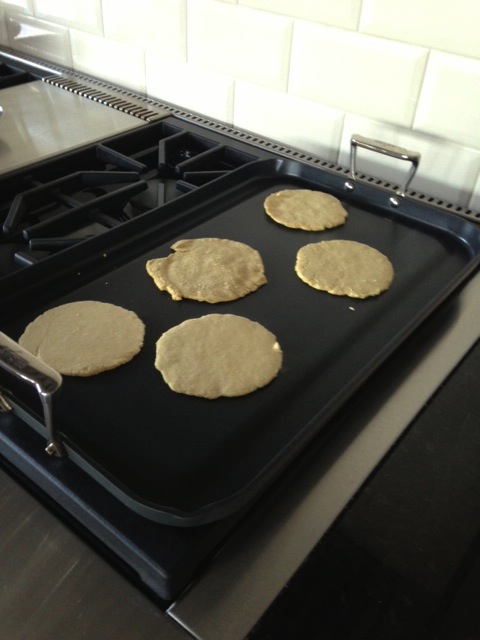
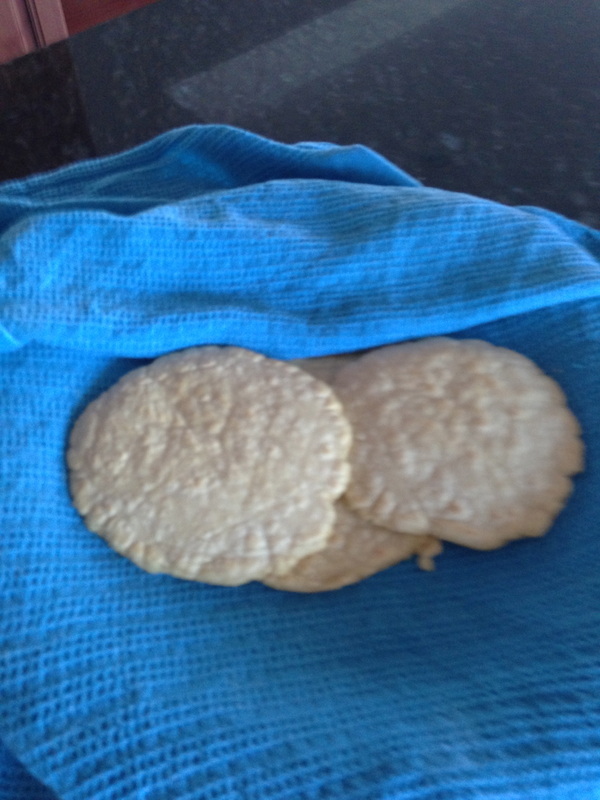
I use these in pastas, salads, or on sandwiches. Yummo. And how easy are they? 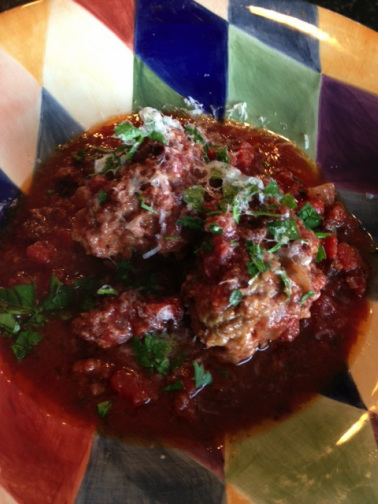 I don't know about you, but in my kitchen, like in my life... Shit happens. But last week, I got a hair up my arse to make meatballs. No, not lamb balls. (You can't see me, but I'm cracking up) I had ground pork and ground beef. What else could I do? Actually, I thought about making meatloaf. Because the closer it got to dinner time, the less enthusiastic I felt about making meatballs, and after all, what is a meatloaf but a giant meatball? More or less. But I had a hankering. I didn't feel like looking at a recipe. Even when I go to the trouble of looking at one I usually lose interest in it half way through. I don't really like to be told what to do. So, I threw the ground pork, beef, breadcrumbs, egg and cream (what doesn't cream make better?) and mixed it up with some grated parmesan, salt and pepper. But, something was still missing. Ahhh...onions. I don't like to put raw onions in my meatballs or meatloaf. So, I chopped one up and got out a skillet. This was already more of a to do than I was in the mood for. But, I was too far in. I remembered that even though I'm Asian, or Asian enough, I was going for an Italian vibe so they needed garlic. I chopped that up and put it in the skillet with the onions. Then, because I was feeling contrary, I added some red pepper flakes. Call me crazy.Next thing you know I'll be parting my hair on the other side, or tearing the tags off mattresses. After the onion, etc. softened, about 5 or so minutes later, I dumped this aromatic, mouthwatering mass of awesome into the meat mixture and squished it all up. With my hands. You have to. So, I made meatballs with my handy dandy scoop and lovingly placed them in a very hot, olive oil bathed pan. All was well in my world. For a coupla minutes. I turned them over so they'd get a nice crisp outer layer on all sides. Except they wouldn't turn over. They stuck to the pan. Usually, I don't get worked up about these faux pas, but this really pissed me off. Pan sticking meatballs and peri-menopause are not friends. And, I'd already spent way more time on this fiasco than I wanted to. So, I started whacking the uncooperative-stuck-to-the-pan-devil-spawn meatballs with my tongs. Then I switched to a spatula to make sure they'd get the beat down they deserved. Damage occurred. I finished browning the meatballs that were still actually balls then took them out to rest on a plate. I proceeded to make my tomato sauce which had now become meat sauce. Kinda crispy meat sauce. I intended to use a jar of already made marinara. Then I remembered I didn't ever buy jarred marinara. I'm one of those really annoying people who say things like, "It's just as easy to make it from scratch." What a dumb ass. So, I dumped a big can of crushed tomatoes into my meatball massacre. I tossed in some dried oregano, basil and thyme along with some sugar. Gotta have sugar in any tomato sauce to take some of the acidity out. Then I squished in some tomato paste because Mario Batali does. And who am I to argue with Mario? Mario wears orange rubber clogs and manages a combover and a ponytail at the same time. What kind of a bad ass is he? I mixed it all in with the smooshed up, crispy meatball pieces then plopped the ones that survived intact into the sauce to simmer until they cooked through. By this time, I started thinking it might turn out. It smelled DIVINE. By the time this all came to a head, I didn't feel like cooking another thing. So, I didn't. I felt a little guilty so I garnished. I think garnishing should get me some points. We just had meatballs. But, I thought I needed more fat so I put about a half a pound of butter on some bread to eat with it. Dipped in the meat sauce...I thought I'd died and gone to Meatball heaven. And those crispy meatball remnants? TO DIE FOR. 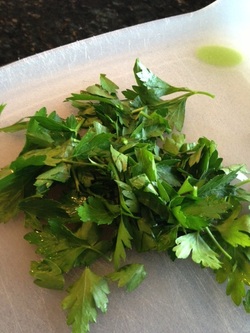 The garnish was such a big deal that I thought it needed a big picture. That's Italian parsley by the way. Not to be confused with Cilantro which is totally from a different country. And no matter how much you tell people that it's "pretty much the same" when you accidentally put it on your pasta dish, it's pretty much not. So this is parsley. I swear. Shit Happens Meatballs with Meat Sauce 1 1b. each ground pork and ground beef 3/4 cup breadcrumbs 1/2 cup heavy cream 1/2 cup grated parmesan plus more for serving 1 egg 1 med. onion diced 1 teas. salt 1/2 teas. pepper olive oil for frying 1/4 to 1/2 teas. red pepper flakes 1 clove chopped garlic 1 28 oz. can crushed tomatoes 1 teas. each dried oregano, basil and thyme (feel free to adjust to your own liking) 2 Tblsp. tomato paste 2-3 teas. sugar In a big bowl throw in the first 5 ingredients. Saute the diced onion with the red pepper flakes and garlic until soft and fragrant. You can let this cool a little before you add it to the meat stuff but the meat stuff is cold so you don't have to. Just incorporate it a little with a wooden spoon to cool it off then dig in and mash it all together with your hands. Shape into meatballs of whatever size you want. Fry in the hot oil till nicely browned. Take out all but 2-3 meatballs depending on their size. While your semi-cooked meatballs chill out on a plate, smash the ones still in the pan with whatever you want to smash them, wooden spoon, fork, you get it. Cook the smashed meatballs until they get a little crispy. Note: If you use a nonstick pan you won't have to worry about them sticking. But you'll have to work the ones left in the pan to get that nice crusty crunch. Add in tomato sauce, paste, dried herbs, sugar and a little water - maybe half a cup. Put the meatballs back in on a low/medium heat, cover until done. About 10 minutes or so. Eat with whatever bread you like. Don't forget to dip.  I have a thing about lamb. I also have kind of a weird rule. When I eat out, I order stuff that I either don't want to cook at home, or that I don't cook well at home. Now, I've cooked lamb at home with various degrees of success. It's been pretty bad, to pretty damn good. Pretty damn good being the exception. So, I usually order it when I'm at a restaurant that has it. Actually, I just like to say, "I'll have the lamb." It sounds so chic. Unless it's shanks. A shank of anything is pretty much the opposite of chic. I've discovered that the kind of lamb I cook the best is ground. Lamb hamburger. I make pretty awesome lamb meatballs. Mostly because when hubby asks what's for dinner, I can say, "lamb balls." Or, if he's going somewhere for lunch I say, "Don't have the lamb balls. We're having those for dinner." Breaks me up every time. This is not a recipe for lamb balls. It's a little more chi chi than that. Lamb Ragu with pasta. Yes, I'm all that. It's ground lamb, shallots, some seasonings, Worcestershire sauce (what is that anyway?), red currant jelly (don't panic - you can use any red jelly you want and no, I don't know what a currant is) and tomatoes. And pasta. Of whatever shape. For some reason, any kind of meat that is even remotely exotic - and I count lamb among them - I have to buy someplace upscale-ish. Like Whole Foods, or better yet, a butcher shop. I'll buy hamburger in a tube from some guy in an alley wearing a trench coat. But, lamb? No dice. You can, however, get it in just about every regular ole grocery store and I'm sure it's fine. Really. I won't make fun of you if you buy it there. Note the following recipe serves 2. I doubled it when I made it, but if there really is just two of you, it's plenty as is. Lamb Ragu with Pasta 1 1/2 Tblsp. garlic oil 1 shallot, chopped 1 Teas. dried mint 1 Teas. dried oregano 1/4 Teas. crushed red pepper flakes 8 oz. ground lamb 1 14oz. can chopped tomatoes 2 Teas. red currant jelly 1 1/2 Teas. Worcestershire sauce Salt to taste, plus some for pasta water Pepper to taste 8 oz. pasta Fresh mint to garnish - optional Put your water on to boil in a large pot, for the pasta. Cook the chopped shallot in a saucepan with the garlic oil for 2 minutes. Sprinkle in all the dried herbs and the pepper flakes. Stir around. Add the ground lamb, breaking it up with a spoon till it looses its pinkness. Add tomatoes, jelly, Worcestershire, salt and a good grinding of pepper and give it a good stir. Bring to a boil, then cover it and let it simmer for 20 minutes. Cook the pasta. When the ragu is done, spoon it on. Garnish with the mint if you feel like it. By the way, I found red currant jelly at Ralph's. Note how cute that curly pasta is. I got it at Target. No kidding. This is a Nigella Lawson recipe from Nigellisima. I didn't feel like garnishing. I rarely do. 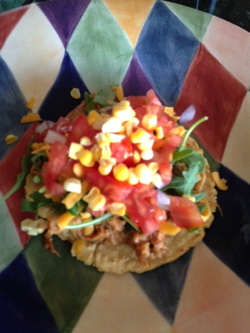 I'm trying something new. Not these tacos. I want to separate food blogs from Bald Spots and Other Catastrophe blogs. That way, if anyone (including me) wants to find a recipe it'll be easier to sort through. If you haven't noticed, I'm still trying to figure this website out. Coincidentally, the book I'm working on concerns a disgraced Food Network Chef. Her show is called A Diva Dines...so here's the first recipe post on my Diva Dines blog. Don't worry, if you already subscribe, or want to subscribe, you'll get both along with your regular subscription. You don't have to do anything twice. Now, about these tacos. The best tacos in the world can be found on the streets of Mexico. Those food carts that everyone tells you not to solicit. Do it anyway. They are sublime. These are not those tacos. But, they're pretty damn good anyway. I'm not a Mexican, nor am I an expert on Mexican food, so I can assure you that since I made these up, they are not the real deal. They're tacos made on the fly by a White girl...well, an Asian girl...an Asian/White girl...you get the picture. No real Mexicans were harmed in the creation of this recipe. Easy, easy, weeknight dinner. Rotisserie chicken from the grocery store, stripped of its meat, ranch dressing and some taco seasoning, mixed up and put in a shell. How easy is that? You toss your shredded chicken meat into a pan over a low-medium heat and sprinkle with some taco seasoning (I got mine at Trader Joe's, but McCormick has one too and you can find it at any grocery store) and some ranch dressing. Stir it around to blend. Because this part was soooo simple, I assuaged my kitchen guilt and made homemade tortilla shells. I can tell you, it's worth it. I realize that the addition of homemade taco shells pretty much obliterates the "easy weeknight meal" concept. So, feel free to buy them already made. I do just that a lot of the time. One of my daughters shamed me into making these with "You mean you don't make your own?" Ummm...that would be a NO. "They're easy, you know," she said. The implied "even you can do it" hung over me like Wile E. Coyote's anvil. So, I bought one of those presser things at Williams Sonoma (better to get them at a Mexican market if you can). I know this because, "You mean you didn't get it at a Mexican market?" My daughter said. The dough couldn't be easier. And it handles waaaay better than pie crust dough. It's masa and water. That's it. You stir it around, then use your hands to form it into a lump, break off small pieces, roll them into a ball and flatten them. They key is to use those plastic leftover grocery bags to put on the press to keep the dough from sticking. My daughter also clued me in on those. "Everybody knows you use those, Mom." I've tried regular plastic wrap, wax paper and parchment paper. None works as well as those leftover plastic bags. I hate it when she's right. You will probably still have a little sticking, so just gently peel the taco away from the plastic. You will also have to master the size. I'm still working on that. My shells are thicker than store bought and thicker than the homemade I've had in Mexico. It's an art form, I can tell you that. At any rate, it doesn't matter if they're ugly like mine, thicker like mine, or what have you. They are hands down so much better than store bought, no matter what their size, or what they look like. Put them on a hot griddle till they're a little crisp and keep them warm in a damp towel. The good thing is you can do these ahead, and just reheat them on the griddle when you're ready to eat them. If you've got leftovers (and you probably will) just toss them in one of those larger ziploc bags and refrigerate. Reheat on the griddle. I don't know how long they will keep. They only last in my house for a day or so because we eat them. You could cut them up, fry them in hot oil, toss around in some salt, and have homemade tortilla chips too. Fill your shells with whatever...the chicken meat mixture plus...whatever makes you happy. I used the usual suspects; cheese, tomatoes, onion and I had some arugula and corn that I threw on too. The corn didn't add anything, so I wouldn't do that again. Corn tortillas, corn...too corny. 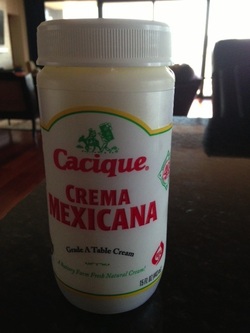 I topped off this stack of goodness with this crema. You can usually find this in any grocery store in the refrigerated stuff. Wherever you use sour cream, you can use this. It's thinner though, but lip smackin' delish! Here's the recipes...which aren't much. Chicken Tacos: Serves 4 or 5 - 2-3 tacos each. 3 cups of shredded chicken meat Ranch Dressing Taco Seasoning I didn't put quantities because it's all to taste. I don't like a lot of seasoning. I used probably 1/2 of the 1.25 oz. package and at least 1/2 cup of the ranch dressing. You can do whatever you think is right. Mix it all up in a pot and heat it up on the stove. Corn Tortillas: 2 cups Masa (you can find this at most regular grocery stores too) pinch of salt 1 3/4 cup water That seems like a lot of water, almost as much water as masa, but its all good. The dough won't be that wet either, it forms a nice, moist, lump of dough. Break off pieces and roll it in your palm till it's a 1 1/2 in diameter ball. The dough dries out quick so keep the bowl covered with a towel while you're making these. If it feels too dry, add a little more water. I live in high altitude and I added a tablespoon or two more. Put your garbage bag so it covers both sides of the press. I just kinda cut the bag all the way open at the seam. You'll have to play around with it. Press the ball of dough out, peel it off the plastic, and heat on a griddle, till its a little crispy and brown. Keep them warm on a damp towel covered plate. Fill and eat! 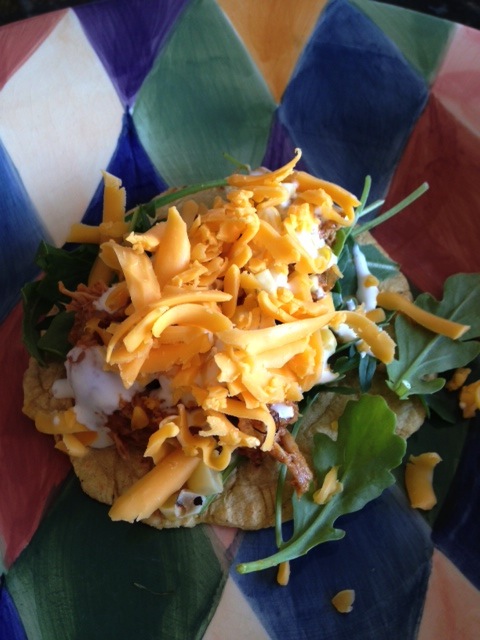 |
AuthorMy upcoming novel Flesh of My Flesh stars Delilah, a fictional TV Chef who stirs up a whole lot of trouble and a little food. Probably better than you'll find here. These recipes are inspired by her, my love of food and overall laziness. Blog Subscription Here
SHARE


Archives
July 2015
|


 RSS Feed
